Bamboo Fly Rods
Do you enjoy fishing in small streams and creeks? If so, you may want to add a few bamboo fly fishing rods to your fly fishing equipment. Follow the steps below to learn how to make bamboo fly rods. Bamboo fly fishing rods are often a good choice for beginning anglers since they are easy to cast
While bamboo fly rods tend to be heavier than graphite fly fishing rods, the additional weight in bamboo is what makes it easier to cast short line lengths using this type of rod. Bamboo also has natural flexibility because the fibers vary in density. This natural flexibility can really enhance the feel of fly fishing lines when loaded on the best bamboo fly rods.
When learning how to make bamboo fly fishing rods, there are several different methods, tools, and techniques that can be used. The simplest method can be separated into eight steps. If the steps below seem too complex, you can always shorten the process somewhat by buying prepared bamboo fly rod kits.
Steps For Making Bamboo Fly Rods
- Materials. Gather your rod making materials. First, you will need a 10 to 12-foot piece of Tonkin cane, which is the type of bamboo most often used in rod making due to its long, dense fibers. You can order Tonkin cane online. Other items you will need include: a heat gun, a rod glue binder, a wood-cleaving froe, lock planes, a scraper plane, splicing blocks, standard screwdriver with sharpened blade, dial calipers, a 60-degree dial indicator depth gauge, machined nickel silver rod ferules, guides, silk thread, and three steel planning forms.
- Splitting. The bamboo pole is then split into six to eight pieces using a special type of wood knife called a froe. These larger bamboo pieces are then split into narrower strips using a standard screwdriver with a sharpened blade. You should end up with six strips from the bottom five feet of the pole or culm -- this will be used for your butt section. The fly rod tip will be made from the top five feet, and since most rods have an extra tip, you should split the top five feet of the bamboo into 12 pieces.
- Filing and Heating. Because bamboo stalks have natural bumps or nodes, the next step will be to file or sand the nodes down, and then apply heat to flatten them out using a heat gun. Once the bamboo pieces are heated, the strips should be clamped in a vise to flatten out the bumps as the bamboo cools.
- Transform Strips into a Triangle. When learning how to make bamboo fly rods, you will need to use a surface planer to shape your bamboo cane strips into equilateral triangles. Once the strips have been formed into equilateral triangles, you will need to temporarily bind them together with string and put them into an oven for heat-treating (heat removes moisture). When the bamboo cools, just remove the string.
- Tapering the Strips. Your next step is to taper the bamboo strips, and then glue them together to form the bamboo fly rod blank. The strips can be tapered by hand or using machine methods. Most anglers who make their own bamboo fly fishing rods use a hand-held block plane in addition to a planning form -- this will allow you to remove any excess cane from the bamboo strips and shape your tapers. The depth of the groove in the planning form should be set to the proper dimensions and the equilateral triangle form of your bamboo strip is placed within the groove. From there, use the hand plane to shave any excess bamboo above the surface of the form. The size of the strip should be a mirror image of the depth that has been set in the form. This process should be repeated with each individual strip.
- Gluing Your Blank. Now that the strips for each of your rod sections have been tapered, they are ready to be glued together using an epoxy. During this step, apply glue to the strips using a toothbrush. From there, roll each section into a hexagon shape and use the rod gluing binder to rotate the sections under pressure and apply the binding cord along the rod blank. Each section should be passed through the binder twice, so that two opposing spiral wraps are applied. Next, each section should be rolled on a flat surface to get rid of any bends or kinks. Then, leave your rod blank to dry. After the glue has cured, the string removed, and any excess glue is sanded or scraped off the blank. The sections are again straightened using the heat gun and cut to the appropriate length.
- Mounting the Ferrules. Once your fly rod blank is sanded or filed to the right diameter, it is time to seat and mount the ferrules. The ferrules will hold the sections of your bamboo fly rod together. Add epoxy to the inside of the ferrule as well as to the seating area on your blank, position the male and female ferrules onto the seating area, and then allow a week or two for the rod to cure.
- Wrapping the Guides. You are almost finished making a bamboo fly rod. As soon as you have determined what type and weight of fly line your rod will be best suited for, you can start wrapping the guides on your rod. The number of guides you use will depend on the length of your rod, but you can use the standard formula of one guide per foot (plus one stripper guide to use for the tip).
Once your rod has cured and the guides are secured, you can start assembling the rest of your fly fishing gear. Select a suitable fly reel based on the weight of your rod, add the matching weight fly line, and then head to a local stream to test out your handmade fly rod creation.
KEEP LEARNING
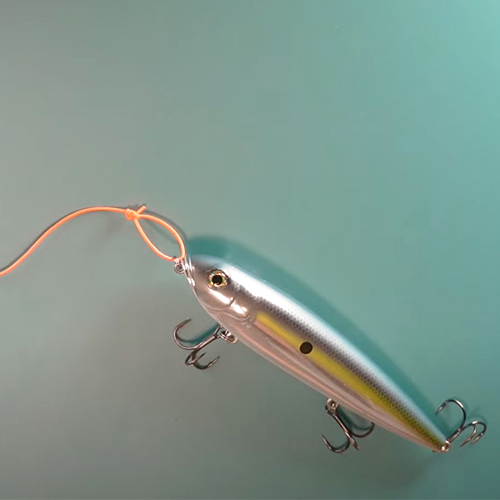
How to Tie the Non-Slip Loop Knot
The non-slip loop knot is a popular and reliable choice for securing hooks, lures, and other tackle to your fishing line.
LEARN MORE
Socials
Take me fishing social media links
LEARN MORE

TakeMeFishing x Teen Vogue
Join us on a creative journey as fashion designer Ahmrii Johnson walks us through her collaborative vision and process with Teen Vogue and fashion brand, Rentrayage, to create a special piece.
LEARN MORE
.png?lang=en-US&ext=.png)